Twitter doesn’t yet come with its own inline image support, so we tend to be limited to using image hosting services, and linking to them with short URLs. So, services like Tweetpic host the image, and we direct traffic to them in return.
Thinking it’s better to keep things in the family, and take better advantage of that traffic, I put together an image hosting setup of my own. Now viewers come to my own site, instead of someone else’s!
It looks like this
The setup consists of an Automator service, and some PHP smarts on the site.
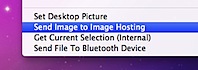 Under Snow Leopard, I can right-click on an image in Finder, click ‘Send Image to Image Hosting’, type in a title, then paste the URL that’s automatically been put onto my clipboard into a tweet.
Here’s how it works – this assumes a moderate level of understanding of PHP and assorted web administration. Update: I couldn’t help myself; I made a WordPress plugin for this, with some extra nice features.
Presentation
First, we need to put together a script that will display the image. What’s more, it would be nice to give the image a title, and link it back to the Twitter account.
So, we’ll want a place to put images, and a way to store the corresponding title and account name.
I opted to store the latter in a file alongside the image called (imagename).meta. I store the title, then a newline, then the Twitter account name.
Lets create image.php — it should take an image name parameter, excluding the file extension, and display the corresponding image, with any corresponding meta data.
Here’s a sample:
<?php $MEDIA_DIR = "twitter-images"; // Get the image name, but avoid any path shenanigans by just grabbing the 'basename' of the file $image = basename($_REQUEST['name']); // Make sure it exists, or report a 404 error if ( !$image || !is_file("$MEDIA_DIR/$image.jpg") ) { include("404.php"); return; } // Grab the meta data if ( file_exists("$MEDIA_DIR/$image.meta") ) { list($title, $source) = file("$MEDIA_DIR/$image.meta"); } // Set a default title if we don't have any meta data if ( !$title ) { $title = ucwords(strtolower($image)); } // Include the page header, if you like include("header.inc.php"); ?> <div class="content"> <img src="/<?php echo MEDIA_DIR ?>/<?php echo $image ?>.jpg" alt="<?php echo htmlspecialchars($title) ?>" class="image" /> <h1><?php echo $title ?></h1> <?php if ( $source ) : ?> <p> From <a href="http://twitter.com/<?php echo $source ?>"> <img src="/media/images/twitter.png" width="14" height="14" alt="Follow us on Twitter!"> <?php echo $source ?> </a> </p> <?php endif; ?> </div> <?php include("footer.inc.php"); ?> |
Make sure it works by making a sample image called, say, IMG.jpg, and an accompanying metadata file, called IMG.meta with a title on the first line and a twitter account name on the second, and opening up http://yoursite.com/image.php?name=IMG
Now, we want to keep URLs short, so they don’t take up too much valuable space in a tweet, so we need to use some tricks here.
We’ll set up a .htaccess file that uses mod_rewrite to keep the URL short.
Something like this should do the trick:
<IfModule mod_rewrite.c>
RewriteEngine On
RewriteBase /
RewriteCond %{REQUEST_URI} ^/([^/]+)$
RewriteCond %{DOCUMENT_ROOT}/twitter-images/%1.jpg -f
RewriteRule (.*) /image.php?name=$1 [L]
</IfModule>
Note on the fifth line we are checking inside our Twitter images folder — make sure that matches your storage path.
This will take any requests that:
- Are located in the web-root (start with a slash, followed by anything but a slash until the end)
- Have a corresponding file within the directory we’ll store images in
Then, it’ll rewrite the request silently to use image.php.
Save the .htaccess file, and open http://yoursite.com/IMG. It should bring up the image, just as before.
Set up some CSS to make it look good, and you’re set. Here’s mine:
/* @group Twitter images */ .twitter-image .content { margin-top: 50px; margin-bottom: 50px; } .twitter-image .content img.image { -moz-border-radius: 20px; -webkit-border-radius: 20px; background: #f1f1f1; border: 1px solid #aaa; padding: 40px; margin-right: 60px; display: block; margin: 0 auto; } .twitter-image .content h1 { padding-top: 60px; text-align: center; } .twitter-image .content p { text-align: center; } .twitter-image .content a { text-decoration: none; } .twitter-image .content a img { vertical-align:text-bottom; } /* @end */ |
Automator
Now, with the web side set up, we need to set up an easy way to send content there.
I opted for an Automator service, which uses scp to upload the content. If your web host doesn’t provide for scp, you may want to use something else like ncftpput, or even an Applescript-able application. You’ll need to modify the Automator action’s shell script accordingly.
Here’s the Automator service I set up: Send Image to Image Hosting.zip.
For those interested, it contains the following shell script:
APPSUPPORT=~/"Library/Application Support/Image Hosting"
TMPDIR='/tmp/image-hosting.tmp'
DEST='me@mywebsite.com:www/mywebsite/twitter-images/'
URLPREFIX='http://mywebsite.com/'
UPLOADRETRIES=3
# GROWL="/usr/local/bin/growlnotify" # Uncomment this if you have Growl and growlnotify

[ ! -e "$APPSUPPORT" ] && mkdir "$APPSUPPORT"

for f in "$@"
do
  if [ ! -e "$f" ]; then
    osascript -e 'tell application "Finder"' -e 'activate' -e 'display dialog "Input file '"$f"' does not exist" with title "Image Hosting" buttons {"OK"} with icon Stop' -e 'end tell'
    exit
  fi

  # Generate random name
  while true; do
      name=`perl -e 'use MIME::Base64; $s=encode_base64(rand()); $s =~ s/=|\n//g; $s = substr($s, -5); print $s'`
      if ! grep "$name" "$APPSUPPORT/Taken Names" &>/dev/null; then break; fi;
  done;

  # Gather info
  default=`php -r '$s = basename("'"$f"'"); echo ucwords(strtolower(substr($s, 0, strpos($s, "."))));'`
  title=`osascript -e 'tell application "Finder"' -e 'activate' -e 'text returned of (display dialog "Enter image title" with title "Image Hosting" default answer "'"$default"'" buttons {"Cancel", "Continue"} default button 2)' -e 'end tell'`
  [ ! "$title" ] && exit
  defaulttwitter=`cat "$APPSUPPORT/Default Twitter Account" 2>/dev/null`
  twitter=`osascript -e 'tell application "Finder"' -e 'activate' -e 'text returned of (display dialog "Enter Twitter account" with title "Image Hosting" default answer "'"$defaulttwitter"'" buttons {"Cancel", "Continue"} default button 2)' -e 'end tell'`
  [ ! "$twitter" ] && exit
  echo $twitter > "$APPSUPPORT/Default Twitter Account"

  # Create temp files
  [ -e "$TMPDIR" ] && rm -rf "$TMPDIR"
  mkdir "$TMPDIR"
  cp "$f" "$TMPDIR/$name.jpg"
  echo "$title
$twitter" > "$TMPDIR/$name.meta"

  [ -f "$GROWL" ] && $GROWL -n 'Image Hosting' "Image Hosting: `basename "$f"`" -m "Image Hosting is uploading '$name'"

  # Upload
  retries=0
  while [ $retries -lt $UPLOADRETRIES ]; do
    result=`scp "$TMPDIR"/* "$DEST" 2>&1` && break;
    [ -f "$GROWL" ] && $GROWL -n "Image Hosting: `basename "$f"`" 'Image Hosting' -m 'Upload failed: Retrying'
    retries=$((retries+1))
  done

  if [ $retries -ge $UPLOADRETRIES ]; then
    osascript -e 'tell application "Finder"' -e 'activate' -e 'display dialog "Could not upload image.  Scp said: '"$result"'" with title "Image Hosting" with icon Stop' -e 'end tell'
    exit
  fi

  echo $name >> "$APPSUPPORT/Taken Names"

  osascript -e 'tell application "Finder" to set the clipboard to "'"$URLPREFIX$name"'"'

  [ -f "$GROWL" ] && $GROWL -n 'Image Hosting' "Image Hosting: `basename "$f"`" -m "Upload complete.  Available at $URLPREFIX/$name (copied to clipboard)"
done |
To use it:
- Unzip it,
- Put it into
Library/Services, - Double-click on it to open it in Automator,
- Change the settings at the top of the ‘Shell Script’ segment —
- Set
DESTto thescpdestination - Set up key-based SSH authentication, so you don’t have to enter the password to upload, or, if you’d prefer to use something other than
scpto upload the file, you can change the upload command further down in the script, underneath the ‘Upload’ comment (look forscp) - Set
URLPREFIXtohttp://yoursite.com - If you have Growl and
growlnotifyinstalled, then setGROWLto the location ofgrowlnotify(highly recommended)
- Set
- Save
Usage
If you’re using Leopard, you may need to log out, then log back in to see the service — I’m not entirely certain. If you’re on Snow Leopard, you should hopefully be set. Right-click on an image file in Finder, and click ‘Send Image to Image Hosting‘.
You should be asked for a title, then asked for a Twitter account name (this will be remembered for next time), then the upload will happen, and when it completes, the URL to the uploaded image will be put onto the clipboard so you can paste straight into Twitter.
Voila.
